在iOS開發中,開發"表單"界面,字段稍微多一點的一般都用UITableView來做,而XLForm就是這樣一個框架,它是創建動態表格視圖最牛逼的iOS庫, 用它實現表單功能,非常簡單,省心省力。但是很可惜,搜索了很多文章都只是翻譯官方文檔,很多人在使用該庫的時候可能都被官方文檔帶走遠了,不知道如何具體使用。正好最近也要用到這個庫,所以寫個入門使用文章供大家參考。
一、 導入項目
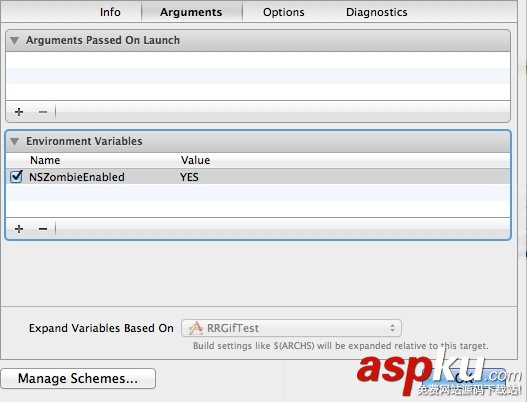
使用CocoaPods或者手動導入庫文件,本人選擇直接導入項目源文件的方式。
導入項目.png
二、改造表單ViewController
讓ViewController繼承自XLFormViewController,并重寫下面的兩個方法
@interface OneViewController : XLFormViewController@end@implementation OneViewController- (instancetype)initWithNibName:(NSString *)nibNameOrNil bundle:(NSBundle *)nibBundleOrNil { self = [super initWithNibName:nibNameOrNil bundle:nibBundleOrNil]; if (self){ [self initializeForm]; } return self;}- (id)initWithCoder:(NSCoder *)aDecoder { self = [super initWithCoder:aDecoder]; if (self){ [self initializeForm]; } return self;}@end三、構造表單
- (void)initializeForm { // 設置是否顯示Cell之間分界線 //self.tableView.separatorStyle = UITableViewCellSeparatorStyleNone; // 設置Section的高度 self.tableView.sectionHeaderHeight = 30; XLFormDescriptor * form;//form,一個表單只有一個 XLFormSectionDescriptor * section;//section,一個表單可能有多個 XLFormRowDescriptor * row; //row,每個section可能有多個row // Form form = [XLFormDescriptor formDescriptor]; // First section section = [XLFormSectionDescriptor formSection]; section.title = @"用戶"; [form addFormSection:section]; // 普通文本 row = [XLFormRowDescriptor formRowDescriptorWithTag:@"username" rowType:XLFormRowDescriptorTypeText]; // 設置placeholder [row.cellConfig setObject:@"用戶名" forKey:@"textField.placeholder"]; // 設置文本顏色 [row.cellConfig setObject:[UIColor redColor] forKey:@"textField.textColor"]; [section addFormRow:row]; // 密碼 row = [XLFormRowDescriptor formRowDescriptorWithTag:@"password" rowType:XLFormRowDescriptorTypePassword]; // 設置placeholder的顏色 NSAttributedString *attrString = [[NSAttributedString alloc] initWithString:@"密碼" attributes: @{NSForegroundColorAttributeName:[UIColor greenColor], }]; [row.cellConfig setObject:attrString forKey:@"textField.attributedPlaceholder"]; [section addFormRow:row]; // Second Section section = [XLFormSectionDescriptor formSection]; section.title = @"日期"; [form addFormSection:section]; // 日期選擇器 row = [XLFormRowDescriptor formRowDescriptorWithTag:@"birthday" rowType:XLFormRowDescriptorTypeDate title:@"出生日期"]; row.value = [NSDate dateWithTimeIntervalSinceNow:60*60*24]; [section addFormRow:row]; // Third Section section = [XLFormSectionDescriptor formSection]; section.title = @"頭像"; [form addFormSection:section]; // 圖片選擇 row = [XLFormRowDescriptor formRowDescriptorWithTag:@"userpic" rowType:XLFormRowDescriptorTypeImage]; [section addFormRow:row]; // Fourth Section section = [XLFormSectionDescriptor formSection]; section.title = @"選擇器"; [form addFormSection:section]; // 選擇器 row = [XLFormRowDescriptor formRowDescriptorWithTag:@"sex" rowType:XLFormRowDescriptorTypeSelectorPush]; row.noValueDisplayText = @"暫無"; row.selectorTitle = @"性別選擇"; row.selectorOptions = @[@"男",@"女",@"其他"]; row.title = @"性別"; [row.cellConfigForSelector setObject:[UIColor redColor] forKey:@"textLabel.textColor"]; [row.cellConfigForSelector setObject:[UIColor greenColor] forKey:@"detailTextLabel.textColor"]; [section addFormRow:row]; // Fifth Section section = [XLFormSectionDescriptor formSection]; section.title = @"加固"; [form addFormSection:section]; // 開關 row = [XLFormRowDescriptor formRowDescriptorWithTag:@"enforce" rowType:XLFormRowDescriptorTypeBooleanSwitch title:@"加固"]; [section addFormRow:row]; // Sixth Section section = [XLFormSectionDescriptor formSection]; [form addFormSection:section]; // 按鈕 row = [XLFormRowDescriptor formRowDescriptorWithTag:@"conform" rowType:XLFormRowDescriptorTypeButton]; row.title = @"確定"; [section addFormRow:row]; self.form = form;}-(void)didSelectFormRow:(XLFormRowDescriptor *)formRow{ // 判斷是不是點擊了確定按鈕 if([formRow.tag isEqualToString:@"conform"] && formRow.rowType == XLFormRowDescriptorTypeButton){ //獲取表單所有到的值 NSDictionary *values = [self formValues]; NSLog(@"%@", values); } [super didSelectFormRow:formRow];}//重寫改該方法 上面的方法就不會調用了//-(void)tableView:(UITableView *)tableView didSelectRowAtIndexPath:(NSIndexPath *)indexPath{//// NSLog(@"%s", __func__);////}@end四、效果圖
效果圖.png
五、總結
前面兩步是官方文檔中可以找到的,也很簡單,關鍵在于initializeForm方法中具體構造表單的過程,這里有必要強調幾點:
1.XLFormViewController實現了UITableViewDataSource, UITableViewDelegate,并且持有一個UITableView,這個從該類的聲明可以看出來,所以UITableView 、UITableViewDataSource, UITableViewDelegate中的方法都可以正常使用。
2.XLForm將表單抽象為Form,Section,Row三個層次,分別對應三個類
XLFormDescriptor * form;//form,一個表單只有一個XLFormSectionDescriptor * section;//section,一個表單可能有多個XLFormRowDescriptor * row; //row,每個section可能有多個row
3.每個表單中的具體信息最后都落腳到XLFormRowDescriptor中,通過它可以配置不同樣式的表單項,通過構造函數的rowType指定具體的表單類型,該框架提供了非常豐富的rowType,具體可以參考官方文檔說明。
4.更細化配置表單項就需要借助于XLFormRowDescriptor中的屬性進行配置,常用的有
@property (nonatomic, readonly, nonnull) NSMutableDictionary * cellConfig;@property (nonatomic, readonly, nonnull) NSMutableDictionary * cellConfigForSelector;
這個配置的時候,往往有同學不知道具體如何才能設置屬性,比如怎么設置表單輸入框的placeholder?更進一步如何設置placeholder 的顏色。其實它用到了KVC,因為它們兩個都是UITextField類中的屬性,那么直接進入UITextField查找,發現如下信息:
@property(nullable, nonatomic,copy) NSString *placeholder; @property(nullable, nonatomic,copy) NSAttributedString *attributedPlaceholder NS_AVAILABLE_IOS(6_0);
那么設置起來就是
[row.cellConfig setObject:@"用戶名" forKey:@"textField.placeholder"]; [row.cellConfig setObject:attrString forKey:@"textField.attributedPlaceholder"];
注意這里的key的寫法,就是KVC的寫法。其他的屬性依此類推。
5.如何獲取設置好的表單的值?其實非常簡單,該框架提供一個方法formValues,它的返回類型是一個NSDictionary,其中key就是XLFormRowDescriptor設置時的Tag。可以直接在控制器中調用該方法獲取表單值,上面的效果圖設置后的表單信息如下:
以上就是本文的全部內容,希望對大家的學習有所幫助,也希望大家多多支持VEVB武林網。
新聞熱點


疑難解答