本文實例為大家分享了iOS TableView實現(xiàn)下拉縮放效果的具體代碼,供大家參考,具體內容如下
在做項目時,一些TableView的地方會使用到下拉TableView讓HeardView頭視圖隨其偏移量的變化而變化,之前做過一次但沒記錄下來。現(xiàn)在做的時候總是遇到一些問題,比如下拉時是以原點向左右兩邊放大,這個只是效果問題。還有就是看到的視圖確實變大了,但是會蓋到下面的TableViewCell。開始以為是加在里面的視圖變大,而TableViewHeardView沒變大,我NSLog打印了一下兩個視圖的高度,發(fā)現(xiàn)是一樣的,找不到問題了。
在網(wǎng)上找了一些相關的例子,各有各的做法,有的是根據(jù)偏移量來設置TableViewHeardView的縮放,有的是設置里面被我們設置為TableViewHeardView的那個視圖的大小,都試了一下感覺還是不行,感覺縮放效果是有了的,但是拉大一點就會把下面的cell蓋住。
之后自己摸索,調整后,我是用偏移量來控制里面的imageView的大小,imageView是我設置的HeardView的子視圖,而heardView和TableViewheard的大小不會根據(jù)imageView變化,只是坐標變了,其實這是一種錯覺,真實的效果是imageView坐標向左上方偏移,大小也變化,而heardView和TableViewheard沒變大,但imageView變大的部分蓋住他們的上方,讓我們覺得heardView和TableViewheard也變大了,可以參考文章下面的邏輯圖。
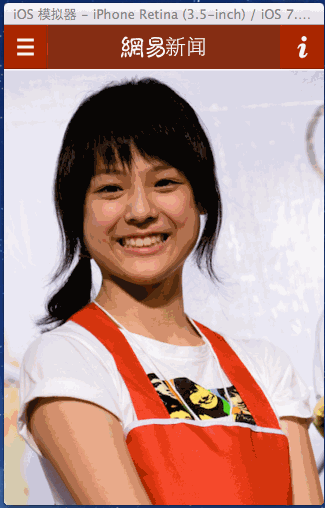
先看一看效果吧,一張是沒下拉時的效果,一張是下拉時的效果。
偏移量下拉縮放效果")
可以看到imageView向四周變大了,而頭像和昵稱只是垂直方向位置變了,而大小沒變。
這里用到的控件入下圖
偏移量下拉縮放效果")
#define ScreenWidth [UIScreen mainScreen].bounds.size.width
在viewDidLoad里創(chuàng)建一下
//========== 頭視圖創(chuàng)建與設置 =========== imageHight = 250; [self creatHeardView];- (void)creatHeardView{ headerView = [[UIView alloc] initWithFrame:(CGRectMake(0, 0, ScreenWidth, imageHight+50))]; //背景視圖 heardImageView = [[UIImageView alloc] init]; heardImageView.frame = CGRectMake(0, 0, ScreenWidth, imageHight); heardImageView.image = [UIImage imageNamed:@"backGround.jpg"]; [headerView addSubview:heardImageView]; //用戶頭像 personImageView = [[UIImageView alloc] initWithFrame:CGRectMake(ScreenWidth-30-60, imageHight-30, 60, 60)]; personImageView.layer.cornerRadius = CGRectGetWidth(personImageView.frame)/2; personImageView.layer.masksToBounds = YES; [headerView addSubview:personImageView]; //用戶名 personNameLabel = [[UILabel alloc] initWithFrame:CGRectMake(CGRectGetMinX(personImageView.frame)-200, CGRectGetMinY(personImageView.frame), 180, 30)]; personNameLabel.font = [UIFont systemFontOfSize:15]; personNameLabel.textColor = [UIColor whiteColor]; personNameLabel.textAlignment = NSTextAlignmentRight; [headerView addSubview:personNameLabel]; //個人簽名 introduceLabel = [[UILabel alloc] initWithFrame:CGRectMake(30, CGRectGetMaxY(personImageView.frame), ScreenWidth-60, 20)]; introduceLabel.font = [UIFont systemFontOfSize:10]; introduceLabel.textColor = [UIColor grayColor]; introduceLabel.textAlignment = NSTextAlignmentRight; [headerView addSubview:introduceLabel]; comTableView.tableHeaderView = headerView;//設置頭視圖}然后在TableView的滾動代理中有一個方法可以實時監(jiān)測滾動偏移量,#pragma mark - 滾動代理- (void)scrollViewDidScroll:(UIScrollView *)scrollView{ CGFloat width = self.view.frame.size.width; // 圖片寬度 CGFloat yOffset = scrollView.contentOffset.y; // 偏移的y值,還要考慮導航欄的64哦 if (yOffset < 0) {//向下拉是負值,向上是正 CGFloat totalOffset = imageHight + ABS(yOffset); CGFloat f = totalOffset / imageHight;//縮放比例 //拉伸后的圖片的frame應該是同比例縮放。 heardImageView.frame = CGRectMake(- (width * f - width) / 2, yOffset, width * f, totalOffset); }}邏輯圖:
偏移量下拉縮放效果")
這樣TableView的下拉縮放頭視圖功能就可以實現(xiàn)了。
以上就是本文的全部內容,希望對大家的學習有所幫助,也希望大家多多支持VEVB武林網(wǎng)。
新聞熱點


疑難解答
圖片精選