一套來自國外網(wǎng)站的資料,既然是關于電壓調(diào)整的那么也是維修所關注的,這就可以作為維修參考來利用。這是一套完整的資料,甚至包括了所需的datasheet。(申明:本人對硬件超頻不感興趣。)
Introduction
The ECS/Elitegroup NFORCE4-A939 is the cheapest nForce4 based motherboard available here in Europe. Although in contrast to the price, the overclocking options and the overall build quality of this board are both really good and far away from appearing cheap. This makes it the perfect victim for some voltmodding action.
Required parts
• 2x 50K trimmer potentiometers for the VCore-Mod
• 3x ~47K SMD 0805 resistors for the VDroop-Mod
• 2x 5-position dip-switches for the VID-Mod
• 1x 200K and 1x 10K trimmer potentiometers for the VDimm-Mod
• 1x 500K and 1x 50K trimmer potentiometers for the VLDT-Mod
• 1x 5K and 1x 500R trimmer potentiometers for the VChipset-Mod
Adjust all the potentiometers to the maximum resistance. Those are the values to start with - they are very important!
For all mods the rule is: The lower the resistance on those potentiometers, the higher the voltage. So make sure you checked if maximum resistance is set before powering up for the first time after doing the mods.
Overview
------------------------------------------------------------------------------------------------------------------------
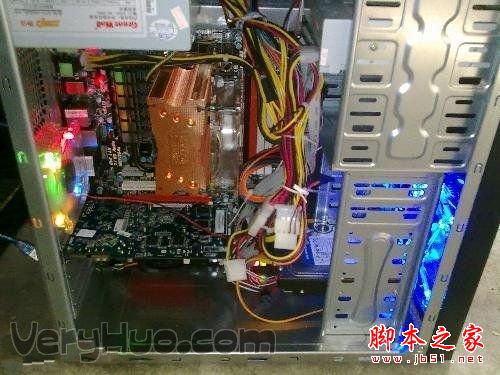
[attach]3237[/attach]
This should give you a rough overview of where to find the specific chips, needed for the modifications.
VCORE
-------------------------------------------------------------------------------------------------------------
Datasheet of the ISL6566 VCore-controller:
[attach]3239[/attach]
In general the VCore-Mod consists of two parts.
VCore-Mod (part1)
--------------------------------------------------------------------------------------------------------------
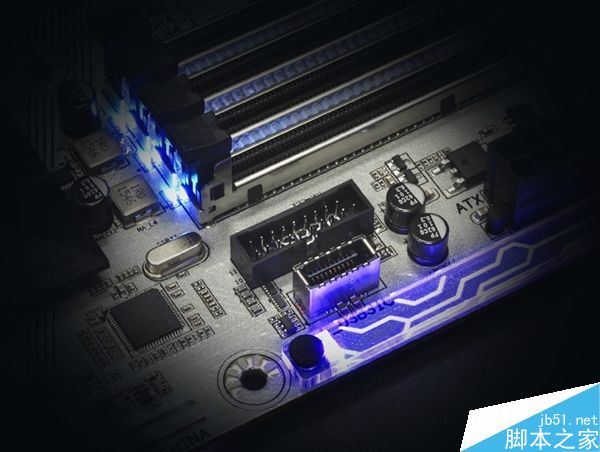
Let's start with the nearly common vmod-method of using the controller's feedback-pin to influence the output voltage. This mod requires you to connect a trimmer potentiometer between pin#9(FB) and Ground.
[attach]3238[/attach]
As you may see, I marked the appropriate points (pin#9 and ground). I advise you to use 2x 50K potentiometers connected in series for this mod. This way you get a total resitance of 100K, but with doubled precision in comparison to a single 100K poti. Now all you have to do is to connect the potentiometers just like shown in the picture. Decreasing resistance now means increasing volts.
VCore-Mod (part2)
-----------------------------------------------------------------------------------------------------------------
The board is also suffering from a very annoying problem: The ISL6566's Overvoltage Protection (OVP) activates when a VCore option of about "+200mV" (might be a bit higher or lower in certain cases; official value is 175mV, according to the datasheet) is set in BIOS. Normally the controller should work in "VRM9.0"-mode, thus it should be no problem to supply a VCore of upto 375mV higher than the CPU's standard VCore. The problem now is that it operates in "AMD-HAMMER"-mode and all VCore-options above "+200mV" are quite useless, because the internal OVP gets tripped.
The ECS support told me, that due to the described problem, the VCOre-options higher than "+225mV" will be disabled in future BIOS releases (at the moment, BIOS 1.1g is the latest version).
The solution to this problem is simply influencing the CPU's standard VCore, which is generated through the 5 so called "VID-Pins". Those pins either carry a voltage higher than 1.2V or lower than this value. If the voltage is higher, it is interpreted as a logical 1 and if it's lower, it means a logical 0. The different voltages at those pins are the base of the VID-code, which consists of ones and zeros and determines the default voltage of the CPU, according to the operating mode of the voltage controller.
[attach]3240[/attach]
I marked the direct connections of the 5 VID-pins (yellow characters), the PULL-UP voltage (green characters) and one Ground point (blue characters).
As the name indicates, the pins marked as "Pull-Up" are used to pull the VID-pins up to a logical 1 ("high" status), while Ground is used to pull them down to a logical 0 ("low" status).
On page 11 (and following) of the ISL6566's datasheet, or the html-table below, you find the needed codes to know which pins to influence to get the desired default CPU voltage. The controller is configured to work in "AMD-HAMMER"-mode on this mainboard, so you have to rely on that table!
To perform this mod, the simplest and best way is to use 2x 5-position dip-switches and connect one side of either dip-switch to the VID-pins. That means pin number one of either 5-position switch to VID0, pin number 2 of the switch to VID1 and so on. Then connect the complete other row of pins (i.e. all 5 pins that are left on the opposite side) of one 5-position dip-switch to the green-marked PULL-UP voltage and finally the rest of the pins of the other 5-position dip-switch to Ground. Now you can set each VID-pin individually to either 1("high") or 0("low"). Of course, if you leave all the connections on the 2 5-position dip-switches "off" (unconnected), the CPU will still boot with its factory default voltage.
Example: The CPU has a default voltage of 1.4V. According to the "AMD-HAMMER"-table below, this corresponds to "0 0 1 1 0".
AMD HAMMER VOLTAGE IDENTIFICATION
VID4 VID3 VID2 VID1 VID0 VDAC
1 1 1 1 1 Off
1 1 1 1 0 0.800
1 1 1 0 1 0.825
1 1 1 0 0 0.850
1 1 0 1 1 0.875
1 1 0 1 0 0.900
1 1 0 0 1 0.925
1 1 0 0 0 0.950
1 0 1 1 1 0.975
1 0 1 1 0 1.000
1 0 1 0 1 1.025
1 0 1 0 0 1.050
1 0 0 1 1 1.075
1 0 0 1 0 1.100
1 0 0 0 1 1.125
1 0 0 0 0 1.150
0 1 1 1 1 1.175
0 1 1 1 0 1.200
0 1 1 0 1 1.225
0 1 1 0 0 1.250
0 1 0 1 1 1.275
0 1 0 1 0 1.300
0 1 0 0 1 1.325
0 1 0 0 0 1.350
0 0 1 1 1 1.375
0 0 1 1 0 1.400
0 0 1 0 1 1.425
0 0 1 0 0 1.450
0 0 0 1 1 1.475
0 0 0 1 0 1.500
0 0 0 0 1 1.525
0 0 0 0 0 1.550
Now let's say we want to increase the default voltage to 1.55V. In order to do so, we need to change the "1", that VID1 and VID2 are set to by default, into a "0", because the VID-Code for 1.55V is "0 0 0 0 0". All we have to do in practice is to connect VID1 and VID2 to Ground and bam, we have 1.55V VCore.
Another short example:
For a default voltage of 1.1V you would need to connect VID4 to the PULL-UP voltage and VID2 to Ground.
I hope you understand the principle.
CAUTION: Only change the VID-code using the dipswitches when the system is powered OFF and never connect any VID-pin to Ground and the PULL-UP voltage at the same time!
VCore Measure
-------------------------------------------------------------------------------------------------------
VDIMM & VLDT
-------------------------------------------------------------------------------------------------------------------------------------------
Datasheet of the LM324 controller:
[attach]3243[/attach]
This controller is responsible for Vdimm as well as VLDT.
[attach]3242[/attach]
VDIMM (left side of the LM324 according to the picture)
--------------------------------------------------------------------------------------------------------------------------------------------
Connect the 200K and the 10K potentiometers in series, thus getting a total resistance of 210K. You could also only use the single 200K poti, but I like to have a bit more precision using the additional 10K poti to adjust the voltage when the changes are too high using the 200K poti alone (mostly in the lower K-Ohm-range). Finally just make the connection between pin#3 and pin#4(VCC) like shown in the picture.
VDimm and VTT Measure
--------------------------------------------------------------------------------------------------------------------------------------------
[attach]3244[/attach]
For the VLDT-mod you do basically the same as for VDimm. You connect 1x 500K and 1x 50K potentiometers in series, and then solder them in between pin#10 and pin#4(VCC). That's all. Just like shown in the picture above.
Important info concerning VLDT:
VLDT is directly dependant on VChipset! That means VLDT can never exceed VChipset. For example for a VLDT of 1.5V you would need to set VChipset to at least 1.55V. And so on...
The higher you set VChipset, the higher the range of adjustable VLDT voltages.
VChipset
------------------------------------------------------------------------------------------------------------
Datasheet of the RT9218 controller:
[attach]3245[/attach]
[attach]3246[/attach]
Take a 5K potentiometer and a 500R potentiometer and connect them in series. Finally connect those potentiometers between pin#12(FB) and Ground/GND(pin#3), just like marked in in the pic.
VChipset & VLDT Measure
------------------------------------------------------------------------------------------------------------
[attach]3247[/attach]
VDroop
------------------------------------------------------------------------------------------------------------
[attach]3248[/attach]
This mod is used to adjust the VCore output while in idle and load until you (nearly) get a exact match. That means the lower the difference between load and idle volts, the better.
The 3 Droop-resistors are marked with RED squares. Those 3 resistors that all have the same value of 39K (marking of "393" on top) need to be exchanged for 3 equal, higher rated resistors. I used three 47K resistors (~20% increase in comparison to the default 39K), because I still had them lying around. With my CPU set to 2.6GHz, at a VCore of 1.6V, I got a Droop of ~0.009V (measured 1.648-1.657V), which I'd consider quite acceptable. Each system behaves a bit different, so you could experiment with higher or lower rated resistors to get the best effect for your individual mainboard.
Perhaps I'll add a VTT-mod if I find the time to. I actually measured VTT under load and it didn't look like it was really necessary to do the mod, but you never know. Perhaps it could help some of you.
Finished! These are all the mods that I discovered for this board. If you have any additional questions or perhaps even some additions to these mod-descritions or ideas about the modifications, then feel free to visit our discussion forums.
Warning:
All modifications are done at your own risk! I am not responsible for any damage caused by the modifications described above! Any hardware modification will definitely void your warranty! Keep that in mind.
ECS nForce4-A939 Voltmods 譯文
1#譯文:
介紹
精英NFORCE4-A939是基于nForce4芯片集的主板,可以從Europe購買。雖然價格低廉,從超頻選項和主板質量兩者來看兩者都是真的很好,遠超過他的價格。這就使他成為做某些電壓調(diào)整的最好對象。
所用元件
2x 50K 電位器用于VCore調(diào)整
3x ~47K 0805 貼片電阻用于VDroop調(diào)整
2x 5位撥動開關用于VID調(diào)整
1x 200K 和 1x 10K 電位器用于VDimm調(diào)整
1x 500K 和 1x 50K 電位器用于VLDT調(diào)整
1x 5K and 1x 500歐電位器用于VChipset調(diào)整
調(diào)整原則是:電位器的電阻越低電壓越高,所以對于第一次和以后的調(diào)整,在打開電源之前確認電位器的電阻設置為最大值。
全景圖
---------------------------------------------------------------
本圖為你尋找特定需要調(diào)整的芯片給一個粗略的位置。
2#譯文:
--------------------------------------------------------------------
VCORE
--------------------------------------------------------------------
VCore控制器ISL6566資料:
通常VCore的調(diào)整有兩部分組成。
VCore調(diào)整 (part1)
--------------------------------------------------------------------
我們就從幾乎最普通的電壓調(diào)整方法開始,利用控制器的反饋引腳來影響輸出電壓。這一調(diào)整方法需要在pin#9(反饋)和地之間連接電位器。
正如你所看到的,我已經(jīng)標記了適當?shù)狞c(pin#9和地)。在作這個調(diào)整時,我建議你用兩個50K電位器串聯(lián)后使用,這樣你有了一個總電阻100K,但比單個100K電位器提高到2倍精度。現(xiàn)在將電位器連接到圖中給出的連接點。減少電阻值就是增大電壓。
VCore調(diào)整 (part2)
---------------------------------------------------------------
這塊主板有一個非常令人頭痛的問題:當VCore在BIOS里選擇大約"+200mV"(某些情況可能或高或低,按照官方數(shù)據(jù)資料是 175mV)ISL6566的超電壓保護(OVP)就起作用。通常情況下,控制器工作在"VRM9.0"模式,這樣對于提供到比CPU核心標準電壓高 375mV 就沒有問題,現(xiàn)在的問題是他工作在"AMD-HAMMER"模式,而且由于內(nèi)部OVP觸發(fā),所有高于 "+200mV"的選項是無效的。
精英的支持告訴我,由于所說到的問題,在以后的BIOS里高于"+225mV"的項目將被撤消(到目前為止,BIOS最新版為1.1g )
要解決這個問題只要通過5根所謂"VID-Pins"的針去影響CPU的標準VCore。這些針每個都有一個高于或低于1.2V電壓,如果電壓高則解釋為“1”,如果低則解釋為“0”。這些針上的電壓是VID碼的基礎,由“1”和“0”組成了的控制器操作碼決定CPU電壓的默認值。
我直接標出了5個VID針(黃色字符),上拉電壓(綠色字符)以及接地點(藍色字符)。
正如這些名字所指出的,標為上拉(Pull-Up)就是把VID針上拉為“1”(“高”態(tài)),而接地就是拉到“0”(“低”態(tài))。
在ISL6566資料第11頁(及以下)或者下表中,你可以找到所要默認CPU電壓的VID定義碼。由于這個主板的控制器設置為 "AMD-HAMMER"模式,因此你必須依靠這個表!
為進行這一調(diào)整,最簡單和最好的方法是用2個5位DIP開關并連接每個DIP開關的一邊到DIP腳,這就意味著每個5位開關的1#針接到VID0,2#針接到VID1等等。然后分別連接開關的另一行每個針(留下的另一邊的一行針)到標有綠色的上拉(PULL-UP)電壓。最后另一個開關的剩下的5個針腳接地。現(xiàn)在你可以獨立地設定“1”或“0”。當然如果2個開關全部設為Off(不連接),CPU以工廠默認電壓啟動。
例子:CPU的默認電壓為1.4V,按照下面的"AMD-HAMMER"表,編碼為"0 0 1 1 0"。
假定我們要增加默認電壓到1.55V,為此,我們需要改變 VID1 和 VID2 的默認“1”為“0”,因為1.55V的VID碼為"0 0 0 0 0"。實際上我們要做的就是將VID1 和 VID2接地來誘使電源給出1.55V核心電壓。
另一個小例子:
要獲得默認電壓1.1V, VID4 接到PULL-UP電壓,VID1 和 VID2接地。
我希望你能懂得這個原理。
警告:VID碼只能在主板不通電的情況下改變,并且不要同時把VID針腳連接到地和 PULL-UP電壓上 !
VCore 測量
----------------------------------------------------------------------------------
3#譯文:
VDIMM & VLDT
----------------------------------------------------------------------------------
LM324控制器資料:
這個控制器負責Vdimm 和 VLDT。
VDIMM (按照圖片,在LM324左邊 )
----------------------------------------------------------------------------------
把200K和10K電位器串聯(lián)為總電阻210K。你也可以用單個200K電位器,但是我喜歡串聯(lián)使用,單獨使用200K電位器不好控制(特別是在電阻較小的地方),有個10K的電位器調(diào)節(jié)更精密。最后將電位器按圖中給出的連接在#3針和#4針(VCC)之間。
VDimm and VTT 測量
-----------------------------------------------------------------------------------
對于VLDT調(diào)整我們可以按照調(diào)整VDimm一樣去做。用一個500K和一個50K 電位器串聯(lián),然后把它們焊接到10#和4#針(VCC)之間。要做的就是這些,就象圖片中那樣。
關于VLDT的重要信息:
VLDT直接和 VChipset相關!這就意味著VLDT永遠不會超過VChipset。例如,要有1.5V的VLDT就需要把VChipset設置為1.55V,等等......
你設定的VChipset越高,VLDT的調(diào)節(jié)范圍就越大。
4#譯文:
VChipset
------------------------------------------------------------------------------
RT9218 控制器數(shù)據(jù)資料:
用一個5K電位器和500歐電位器串聯(lián),并按圖所示把它們連接到12#(FB)和接地腳(3#針)上。
VChipset & VLDT 測量
-------------------------------------------------------------------------------
VDroop
-------------------------------------------------------------------------------
這一調(diào)節(jié)主要用于調(diào)整空閑和加載VCore輸出直到獲得接近于匹配。即空閑和加載時的電壓差別越小越好。
3個Droop電阻用紅色圈出,3個電阻相同均為39K(標有393字樣)你需要改變?yōu)?個相等的較高額定值的電阻。我用3個47K電阻(比原先39K增加20%),我仍舊把它們放好。我的CPU設置為2.6GHz, VCore為1.6V, 結果電壓降落為大約 ~0.009V (測得1.648-1.657V),我認為是相當可以接受的。每個系統(tǒng)性能會有一點兒差別,所以你可以用阻值大一點或小一點的電阻在你的主板上獲取最佳效果。
也許我有時間的時候會加一個VTT調(diào)整。我在加載的情況下實際測量VTT,看起來似乎沒有必要去做這一調(diào)整,但是永遠無法肯定,也許它對你會有所幫助。
警告:
所有調(diào)整的風險均由你自己承擔!我不承擔上面所說的調(diào)整帶來的損壞的責任!任何硬件修改絕對會失去保修!請記住著一點。