1、安裝vnc和vncserver
#yum install tigervnc tigervnc-server
2、啟動VNC服務# vncserverYou will require a passWord to access your desktops.Password:Verify:會提示輸入密碼,這個密碼是遠程登錄時所需要輸入的密碼。 我嘗試無密碼登錄,好像還不行,必須整個密碼。這里要關閉防火墻,/etc/init.d/iptables stop
3、編輯VNC配置文件vi /etc/sysconfig/vncserversVNCSERVERS="1:root" //去掉#,按實際配置桌面號和用戶名VNCSERVERARGS[2]="-geometry 1024x768 -nolisten tcp -localhost" //去掉#,配置分辨率修改后保存退出
4、設置vnc服務器開機自動啟動:方法一:使用“ntsysv”命令啟動圖形化服務配置程序,選中vncserver服務,點擊確定即可。方法二:在終端里使用chkconfig命令:# chkconfig vncserver on# chkconfig --list vncservervncserver 0:off 1:off 2:on 3:on 4:on 5:on 6:off
5、更改VNC連接密碼:(也可以不改)# vncpasswd
到這里VNC服務端就基本完成了,可以在另一臺機器上用VNC客戶端(如RealVNC)遠程登錄CentOS:輸入:CentOS系統IP:5901(默認端口號) (如在RealVNC窗口輸入:192.168.1.100:5901)之后會提示輸入密碼。
6、如果連接上以后出現灰屏或者只顯示終端(命令行)不進入圖形界面(已安裝圖形界面的情況下),可以按照下面的方法設置:
進入用戶的home目錄,cd /home/user如果是用root賬號登錄的,那么當前目錄就是用戶根目錄# cd ~/.vncvi xstartup //編輯xstartup配置#twm & //加#,注釋掉這一行gnome-session & //添加這一行保存退出即可正常連接!
vbox安裝:http://www.CUOXin.com/xia520pi/p/3545666.html
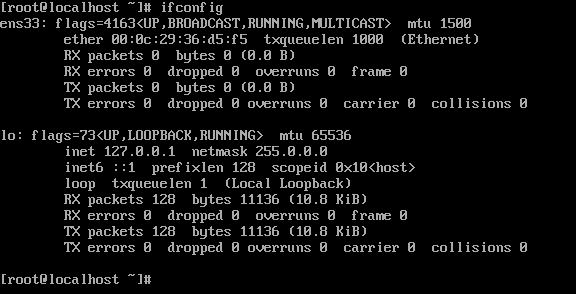
公司測試環境安裝的都是RHEL6.3,在進行虛擬機克隆后,發現clone的虛擬機網卡起不來,具體報如下錯誤:[root@localhost Desktop]# service network restartShutting down loopback interface: [ OK ]Bringing up loopback interface: [ OK ]Bringing up interface eth0: Error: No suitable device found: no device found for connection 'System eth0'. [FAILED]當你執行ifconfig命令的時候,會發現顯示eth1網卡的配置文件卻為/etc/sysconfig/network-scripts/ifcfg-eth0。
[root@localhost network-scripts]# ifconfig|grep addreth1 Link encap:Ethernet HWaddr 00:0c:29:f4:95:e3 inet6 addr: fe80::20c:29ff:fe5c:65b7/64 Scope:Link Interrupt:19 Base address:0x2024 inet addr:127.0.0.1 Mask:255.0.0.0 inet6 addr: ::1/128 Scope:Host[root@localhost network-scripts]# lsifcfg-eth0 ifdown-isdn ifup-aliases ifup-plusb init.ipv6-globalifcfg-lo ifdown-post ifup-bnep ifup-post net.hotplugifdown ifdown-ppp ifup-eth ifup-ppp network-functionsifdown-bnep ifdown-routes ifup-ippp ifup-routes network-functions-ipv6ifdown-eth ifdown-sit ifup-ipv6 ifup-sitifdown-ippp ifdown-tunnel ifup-isdn ifup-tunnelifdown-ipv6 ifup ifup-plip ifup-wireless[root@localhost network-scripts]#產生這個問題的原因是虛擬機分配給操作系統的虛擬網卡MAC地址是不一樣的。第一個系統的網卡MAC地址記錄在了/etc/udev/rules.d /70-persistent-net.rules,命名為eth0。新克隆分配的系統的網卡MAC地址也記錄在了該文件當中,與之前的系統一樣,因此有 了沖突。
可以查看一下兩個機子的這個70-persistent-net.rules文件的內容
第一個系統:[root@localhost rules.d]# cat 70-persistent-net.rules# This file was automatically generated by the /lib/udev/write_net_rules# PRogram, run by the persistent-net-generator.rules rules file.## You can modify it, as long as you keep each rule on a single# line, and change only the value of the NAME= key.
# PCI device 0x1022:0x2000 (pcnet32)SUBSYSTEM=="net", ACTION=="add", DRIVERS=="?*", ATTR{address}=="00:0c:29:f4:95:e3", ATTR{type}=="1", KERNEL=="eth*", NAME="eth0"
克隆后的系統:
[root@localhost rules.d]# cat 70-persistent-net.rules# This file was automatically generated by the /lib/udev/write_net_rules# program, run by the persistent-net-generator.rules rules file.## You can modify it, as long as you keep each rule on a single# line, and change only the value of the NAME= key.
# PCI device 0x1022:0x2000 (pcnet32)SUBSYSTEM=="net", ACTION=="add", DRIVERS=="?*", ATTR{address}=="00:0c:29:f4:95:e3", ATTR{type}=="1", KERNEL=="eth*", NAME="eth1"
我們可以看到這兩個系統中的MAC地址一樣。
問題解決方法:刪除克隆后這個系統中的 /etc/udev/rules.d/70-persistent-net.rules文件,重啟后系統會重新生成一個新的虛擬網卡MAC地址,然后把這 個文件里NAME="eth1"的eth1改成eth0,同時也要修改ATTR{address}里的mac地址和/etc/sysconfig /network-scripts/ifcfg-eth0文件mac地址,并與新的虛擬網卡MAC地址保持一致。
如:將原文件的SUBSYSTEM=="net", ACTION=="add", DRIVERS=="?*", ATTR{address}=="00:0c:29:f4:95:e3", ATTR{type}=="1", KERNEL=="eth*", NAME="eth1"
改為 SUBSYSTEM=="net", ACTION=="add", DRIVERS=="?*", ATTR{address}=="00:0c:29:5c:65:b7", ATTR{type}=="1", KERNEL=="eth*", NAME="eth0"
修改/etc/sysconfig/network-scripts/ifcfg-eth0文件
DEVICE="eth0"IPV6INIT="yes"NM_CONTROLLED="yes"ONBOOT="yes"TYPE="Ethernet"UUID="05944003-ae77-4c9d-9e58-3ec2851db71d"DEFROUTE=yesIPV4_FAILURE_FATAL=yesIPV6_AUTOCONF=yesIPV6_DEFROUTE=yesIPV6_FAILURE_FATAL=noNAME="System eth0"HWADDR=00:0c:29:5c:65:b7然后重啟網絡服務,發現一切正常了。[root@localhost Desktop]# service network restartShutting down interface eth0: Device state: 3 (disconnected) [ OK ]Shutting down loopback interface: [ OK ]Bringing up loopback interface: [ OK ]Bringing up interface eth0: Active connection state: activatingActive connection path: /org/freedesktop/NetworkManager/ActiveConnection/1state: activatedConnection activated [ OK ]
設置IP后,再檢查一下[root@localhost Desktop]# ifconfig|grep addreth0 Link encap:Ethernet HWaddr 00:0C:29:5C:65:B7 inet addr:192.168.0.129 Bcast:192.168.0.255 Mask:255.255.255.0 inet6 addr: fe80::20c:29ff:fe5c:65b7/64 Scope:Link Interrupt:19 Base address:0x2024 inet addr:127.0.0.1 Mask:255.0.0.0 inet6 addr: ::1/128 Scope:Host注:如果你執行ifconfig命令的時候,發現仍然顯示eth1而不是eth0,可以將系統重啟一遍就變過來了。
新聞熱點


疑難解答