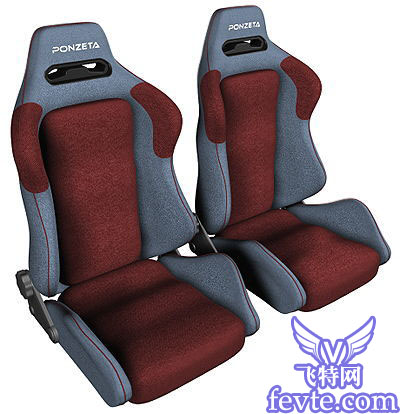
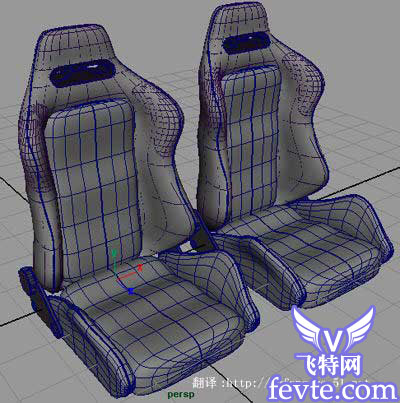
本教程向大家介紹maya nurbs 汽車坐椅建模的過程,教程很經典,制作起來難度也不大,希望教程對朋友們有所幫助!
翻譯說明: 為了讓大家更能理解這個教程,我并不翻譯其中一些命令,這樣可以讓一些初學者 ( 不是很熟悉 maya nurbs 建模命令 ) 更快找到這些命令。另:我的英文不好,所以在翻譯的時候會有一些不足之處,如果有讓你發笑的地方,請你給我提醒,我將更改過來 , 我的 email: [email protected].
希望可以和大家一同進步!
rendered using maya 7.0 (software render)
create seat gear rotater
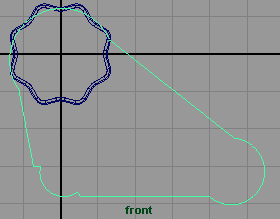
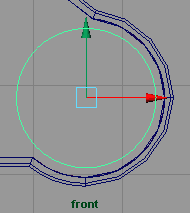
from front view, create a beveled gear profile (pic 1) and bevel plusit (width 0.5, depth 0.5, extrude depth 1.5 and outer style curve convex out) (pic 2).
在前視窗中創建齒輪的輪廓曲線 (pic 1) 并用 bevel plus 它 ,bevel 的取值 (width 0.5(width 0.5, depth 0.5, extrude depth 1.5 和 outer style curve convex out)(pic 2).
pic 1

pic 2
next, create another profile curve (pic 3) and bevel plus it (width 0.1, depth 0.1, extrude depth 0.2 and outer style curve concave in) (pic4)
接下來,創建另一條曲線 (pic 3) 并 bevel plus 它,取值如下 (width 0.1, depth 0.1, extrude depth 0.2 and outer style curve concave in) (pic 4).
pic 3
pic 4
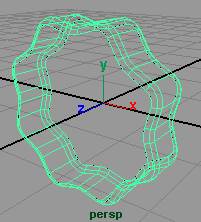
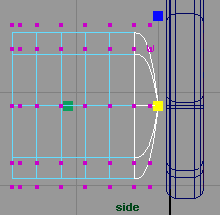
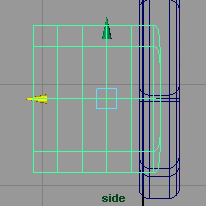
create a nurbs cylinder (6 spans), rotate to 90° and rescale it smaller and drag to the center of the bottom right circle corner (pic 5). from side view, tweak the right-end cv's and rescale them smaller (very small until it looks like they are touching each other) (pic6).
youcould use front view zoom to check it, and then adjust 2 more right cv's and drag to the left, until it looks like this image (pic 7), and then duplicate this cylinder and hide the new one (copied) , errh what is this ? duplicate ?... you will know later :)
創建一個 nurbs 圓柱體 (spans 為 6), 旋轉 90 度 , 并將它縮小移動到如 (fig 5) 所示,切換到側視窗, 拉伸最右排的 cv 點并將其縮到看上去合成一點為止 .(pic 6) 你可以切換到前視窗當中放大來檢查它,接著調整最右邊的兩排 cv 點 ( 包含我們所縮小的那一排 ) ,并將它們向左移動到如 (pic 7) 所示 , 調整好后復制這個曲面,并將復制出來的曲面隱藏起來,為什么 ? 向下看你就會明白的 ...
pic 5
pic 6
pic 7

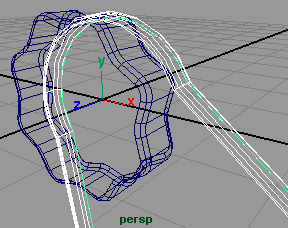
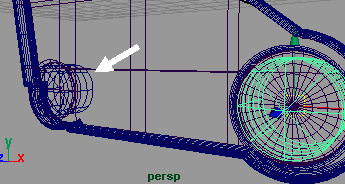
now drag the cylinder to the center of the beveled curves (pic 8), nowselectyour beveled surface,selectyour cylinder, then fillet circular it with value of around 0.056 (reverse direction) and then trimit, you will have this cute half hole (pic 9).
將圓柱體移動到 bevel 的曲線中心 (pic 8), 現在 -- 選擇你 bevel 出來的曲面 , 按 shift 鍵選擇圓柱體,然后 circular fillet 它們, circular fillet 取值約為 0.056, 完成后對它們分別 trim,我們可以得到如 (pic 9).
remember the one cylinder that we hid before ? unhide it, rotate it to 180 of y axis, rescale it smaller a little bit, and place it in the center of this new half hole (pic 10).
你是否記得我們隱藏的那個曲面 ? 顯示它,在 y 軸方向上旋轉 180 度 , 將它縮小一點,并將它移動到中心如 (pic 10)
pic 8
pic 9
pic 10

do the same with the bottom left circle corner (pic 11).
左邊的齒輪用同樣的的方法做出 (pic 11)
pic 11
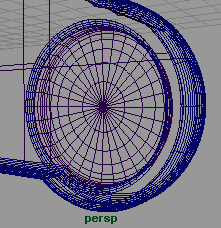
選擇你所有的物體,進入到全局渲染里,設置 nurbs tessellation , 將 curvature tolerance 高為更高組另, u 和 v 取到 5000, 然后 set and close 并渲染它,這樣我們得到如 (pic 12) 的物體 .
pic 12

wheee...everything is so easy and so smooth with maya isn't it ?, but oops...this is just part 1. :(
note : you could put logo thereordo whatever you want, more detailorsomething... :)
喔 ....maya 是否很簡單 ? 不要急,以上只是第一節 :(
注意 : 你可以在這里放上你喜歡的標記 , 或者刻畫更多的細節 .... :)
nowselectall these objects, group them and name the group "rotator", and then save this file as "rotator_gear.mb"ordo whatever you like with the file name. :)
現在選擇你所有的物體,并將它們成組,將組命名為 "rotator", 并存儲文件為 "rototor_gearmb"( 也可以是你想用的名字 )
create bottom seat upholstery
制作椅子的扶手
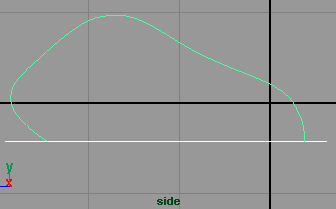
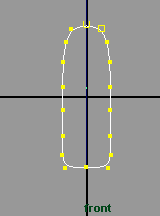
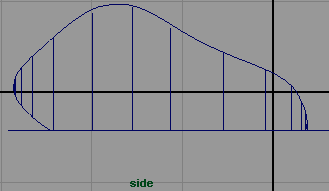
from side view, create 2 profile curves like in this image (pic 13), then from front view, create a nurbs circle with 18 sections, rotate it 90°, then adjust the cv's with the scale and move tools until it looks like in this image (pic 14).
在側視窗,創建兩條輪廓曲線 (pic 13), 回到前視窗,再創建一條 nurbs 圓形曲線 (section 18), 旋轉 90 度,然后調整它的各 cv 點到像 (pic 14) 所示 .
pic 13
pic 14
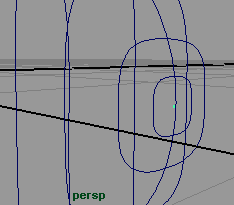
here's the perspective view
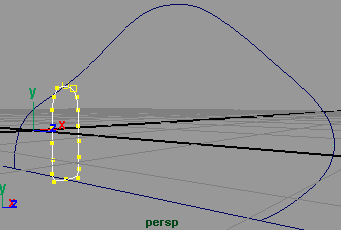
這是透視圖
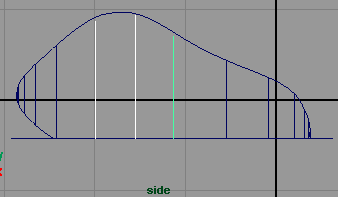
then duplicate this curve and rescale it (y axis), move it many times(following the shape of the profile curve) until it looks like this (pic 14). note : you must rescale the start and end curves very small (pic 15).
然后復制一些曲線并在 y 軸方向上放大或縮小它們,調整到如 (pic 14). 記住 : 最開始和結束的曲線你要盡量將其縮到最小 .(pic 15)
pic 14
pic 15
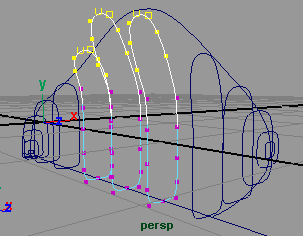
thenselectthese 3 curves (pic 16),selecta couple of the top cv's and then move them to the left a little bit and rotate them also to the left (pic 17).
選擇這 3 條曲線 (pic 16), 將它們的一些 cv 點向左移動并消微放大一點 (pic 17).
pic 16
pic 17
nowselectall these curves from start to end (not the profile) and then surface loft . you will have this new object (pic 18), now duplicate mirror this new object with the parameters shown here (pic 19).
note : the translate value could be different, but scale -1 is a must for mirror duplicate :)
現在依此選擇這些曲線(不含那條輪廓線 ) 然后 surface loft . 你將得到一個曲面如 (pic 18), 接著以鏡像的方式復制這個物體,復制的選項請看 (pic 19).
注意 : 移動 (translate) 的數值可以有所不同,但是拉伸 (scale) 的數值為 -1 時表示以鏡像的方式復制 .
新聞熱點


疑難解答