今天公司有一個新的需求,就是要在返回的作業照片里面可以涂鴉批改,批改完后就連同批改后的照片上傳到服務器。這對我不怎么熟悉canvas的人來說是個挑戰。
需求分析
技術上的實現思路
在聽到這需求后的第一反應就是用canvas來做,所以我在w3school閱讀了 canvas的API .
1.將圖片轉到canvas,用到API: drawImage()
2畫筆的實現
3.清除功能:講原始的圖片再次用drawImage()函數來重置
4.撤回功能:在每次按下鼠標那時候,用getImageData()函數獲取當前的圖像記錄到數組里面,然后按撤回則使用putImageData()函數放在canvas
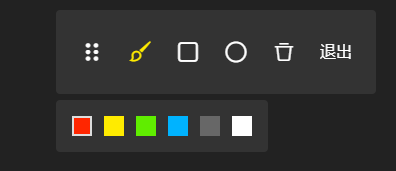
5.畫筆的顏色:在mousemove里面改變strokeStyle筆的顏色
代碼實現
移動鼠標畫出線條的代碼
let self = this; this.canvasNode = document.createElement('canvas'); let styleString = this.utils.formatStyle(CANVAS_STYLE); // CANVAS_STYLE是canvas的樣式 this.canvasNode.setAttribute('id','canvas'); // 一定要設置這width 和 height let ratio = this.imgNode.width / this.imgNode.height, height = this.imgNode.height, width = this.imgNode.width; let tempWidth , tempHeight; // 按比例伸縮 if(ratio >= window.innerWidth / window.innerHeight){ if(width > window.innerWidth){ tempWidth = window.innerWidth; tempHeight = height * window.innerWidth / width; } else { tempWidth = width; tempHeight = height; } }else{ if(height > window.innerHeight){ tempWidth = width * window.innerHeight / width; tempHeight = window.innerHeight; }else{ tempWidth = width; tempHeight = height; } } this.canvasNode.height = tempHeight; this.canvasNode.width = tempWidth; styleString = Object.assign({'width': tempWidth, 'height': tempHeight}, CANVAS_STYLE); this.canvasNode.setAttribute('style', styleString); let ctx = this.canvasNode.getContext('2d'), startX = 0, startY = 0; let image = new Image() ; image.setAttribute("crossOrigin",'Anonymous') // 加時間戳因為這圖片的域名沒設置跨域https://www.jianshu.com/p/c3aa975923de image.src = this.imgNode.src + '?t=' + new Date().getTime(); image.height = tempHeight; image.width = tempWidth; image.onload = function(){ ctx.drawImage(image, 0, 0, tempWidth, tempHeight); } // 鼠標移動事件 let mousemoveFn = function(e) { ctx.beginPath(); ctx.lineWidth = 3; ctx.strokeStyle = self.currentColor; if(startX == e.clientX - self.canvasNode.offsetLeft || startY === e.clientY - self.canvasNode.offsetTop ) return ctx.moveTo(startX,startY); ctx.lineTo(e.clientX - self.canvasNode.offsetLeft , e.clientY - self.canvasNode.offsetTop ); ctx.stroke(); startX = e.clientX - self.canvasNode.offsetLeft; startY = e.clientY - self.canvasNode.offsetTop ; // 37是header的高度 } // 鼠標按下事件 this.canvasNode.addEventListener("mousedown",function(e){ startX = e.clientX - self.canvasNode.offsetLeft; startY = e.clientY - self.canvasNode.offsetTop ; // 如果在mouseup那里記錄 則在撤回時候要做多一個步驟 let imageData = ctx.getImageData(0,0, self.canvasNode.width, self.canvasNode.height); self.imageDataArray.push(imageData); // 這imageDataArray用來記錄畫筆的筆畫 self.canvasNode.addEventListener("mousemove", mousemoveFn, false); },false); this.canvasNode.addEventListener('mouseup', function(e){ self.canvasNode.removeEventListener('mousemove', mousemoveFn); }); this.bgNode.appendChild(this.canvasNode);遇到的問題
1.圖片的跨域問題 因為這個域名只設置了192.168.6.*的跨域,所以我localhost的域名會報跨域的問題(只對192.168.6.*的跨域是同事告訴我的,不然我還在傻乎乎的查問題)
解決辦法:設置vue.congfig.js文件的dev下的host
2.圖片的按比例伸縮完按保存后圖片的尺寸變了 我用toDataURL()方法輸出的base64后的圖片尺寸變了。原因:在我把圖片draw上canvas上時候,用了上面代碼的圖片那比例伸縮的算法把圖片變小了,所以畫在canvas上的圖片也變小了...
解決辦法:(待解決)
總結
到此這篇關于基于html5 canvas做批改作業的小插件的文章就介紹到這了,更多相關canvas 批改作業插件內容請搜索武林網以前的文章或繼續瀏覽下面的相關文章,希望大家以后多多支持武林網!
新聞熱點


疑難解答