步驟1
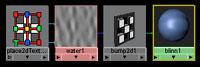
打開 hypershade 窗口,建立一個 blin 材質接點
打開 blin 的屬性編輯器。
設置 color =light blue
指定一個 water texture=bump mapping
把這個紋理更名為 ripple.
步驟2
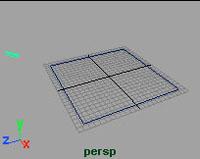
建一個 nurbs plane ,縮放他使他和透視圖中網格大小差不多。
加一盞方向光使之能照亮平面。 指定 blin 給平面。
步驟 3
在 ripple 的屬性編輯器設置如下:
wave amplitude =0.0
ripple amplitude =4.0
spread rate = 0.5
這是主要的水的紋理,其他的水的紋理將加到 color offset 屬性中。
步驟 4
要讓漣漪動起來,你還需要在 ripple time 屬性中加關鍵幀。
確信 timeslider 在第一幀, 在 ripple 貼圖的屬性編輯器中,設置 ripple time 為 0
使用鼠標右鍵設置關鍵幀。移動時間滑條到 40 ,將 ripple time 設為 1 。

步驟 5
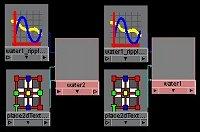
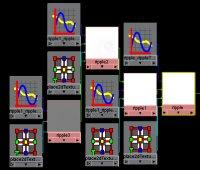
現在復制帶有動畫的 ripple 紋理。選擇 hypershade 窗口中的 ripple 結點。執行 ed99v>duplicate>shading network. 把這個紋理改為 ripple1. 這樣就建立了一個新的水的節點。
步驟 6
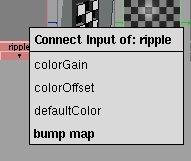
在 ripple1 的屬性編輯器中,改變 ripple origin = 0.2 and 0.3, 最后用鼠標中鍵拖動 ripple1 到 ripple 上,在彈出的菜單中連接到 color offset 上,注意在 hypershade 中水的紋理發生的變化。 在這你會發現原來的紋理變白了,這是因為 color offset 是用來增加顏色的。把一個紋理賦給他,實際上也給他加了更多的顏色,結果產生的白色的效果。 這時的 bump 還在,盡管你看不到他。
注: 看到了 hypershade 窗口中原來的水紋理所發生的變化,你也可以用 ramp 重新設置原始水紋的顏色。
步驟 7
重復上面的步驟再生成兩個水的紋理,將他們的名字變為 ripple2 和 ripple3. 連接 ripple2 到 ripple2 的 coloroffset 上。
把 ripple2 的 ripple origin 改為 0.4 and 0.4, 把 ripple3 的 origin 改為 0.3 and 0.5
步驟 8
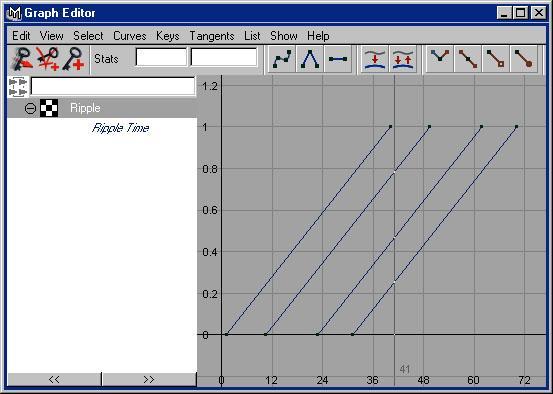
在 hypershade 窗口中,選擇 ripple3 texture ,選擇 window>animation ed99vors>graph ed99vor, 按下 w 鍵,選擇移動工具。在曲線上面敲下選擇他,按住左鍵不放配合 shift 鍵,向右移動曲線使最后的一個關鍵幀在 70 附近。
依次類推, ripple2 和 ripple1 的最后一幀,設為 60 , 55 左右。
新聞熱點


疑難解答