ajax 幻燈片放映
個人圖像管理應用程序(如 macintosh® 上的 apple® iphoto®)使得幻燈片瀏覽廣為人知。在幻燈片瀏覽中,圖像按照時間順序先后淡入淡出。此外,圖片還通過所謂的 “ken burns effect” 進行移動和縮放。
在該例中,我讓瀏覽器從服務器上下載一個圖像列表。然后使用動態 html(dhtml)把圖片列表組成一個幻燈片。我使用隨機的緩慢移動、縮放和漸變來改變圖片,實現了令人滿意的 ken burns effect 版本,而不需要下載 macromedia® flash 或其他重量級的動畫工具。
體系結構
要了解 ajax 有何不同,首先必須理解當前的 web 編程模型。客戶機和服務器之間的簡單交互如 圖 1 所示。
圖 1. 客戶機-服務器交互的 web v1.0 模型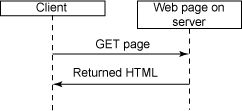
web 瀏覽器或者客戶機 向 web 服務器發出 get 或 post 請求。服務器格式化 html 響應。客戶機解析 html 并顯示給用戶。如果用戶單擊其他鏈接和按鈕,就向服務器發出另一個請求,用服務器返回的新頁面替換當前頁面。
新模型具有更多的異步特色,如 圖 2 所示。
圖 2. 客戶機-服務器交互的 ajax 模型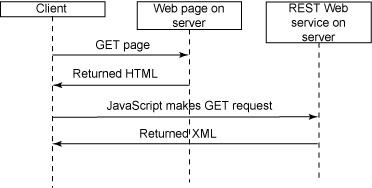
在新的模型中,和以前一樣,服務器也返回 html 頁面。但是這個頁面中有一些 javascript 代碼。在需要的時候,這些代碼向服務器請求更多信息。這些請求可以是簡單的 get 請求(representational state transfer (rest) 服務)或者 post 請求(soap)。
然后,javascript 代碼解析響應(通常用 xml 編碼)并動態更新頁面以反映新的數據。除了 xml 外,還返回 javascript serialized object notation(json)格式編碼的數據。瀏覽器很容易理解這類數據,但其他類型的客戶機則不行。返回 xml 的意義在于瀏覽器之外的其他客戶機也能解釋數據。選擇由您來決定并依賴于具體的應用程序。
開發 ajax 幻燈片的第一步是結合 rest 數據服務。該例中使用 php 頁面返回所有可用的幻燈片圖像及其大小(寬和高)。所有圖像都放在 images 目錄中。文件名格式為 name_width_height.jpg,比如 oso1_768_700.jpg 表示該文件是我的狗 oso 的照片,寬 768 像素,高 700 像素。我堅持使用這種命名方式,因為這樣就很容易確定圖片的寬和高,而不用費力去打開 adobe® photoshop® 或 macromedia fireworks。
我使用 清單 1 所示的 php 服務器代碼來提供圖片列表。
清單 1. slides.php 服務器頁面
<?php
header( "content-type: text/xml" );
?>
<slides>
<?php
if ($handle = opendir('images')) {
while (false !== ($file = readdir($handle)))
{
if ( preg_match( "/[.]jpg$/", $file ) ) {
preg_match( "/_(/d+)_(/d+)[.]/", $file, $found );
?>
<slide src="images/<?php echo $file; ?>"
width="<?php echo $found[1]; ?>"
height="<?php echo $found[2]; ?>" /><?php echo( "/n" ); ?>
<?php
}
}
closedir($handle);
}
?>
</slides>
代碼很簡單。首先將內容類型設置為 xml。讓瀏覽器將該文檔識別為 xml 并為其創建文檔對象模型(dom)至關重要。代碼從 <slides> 標記開始,然后讀取圖片目錄并為遇到的每個圖片創建 <slide> 標記。最后腳本結束 <slides> 標記。
如果用 mozilla® firefox® 瀏覽器打開(在我的機器上)本地主機 kenburns 目錄中的該頁面,就會看到 圖 3 所示的結果。
圖 3. slides.php 服務器腳本的輸出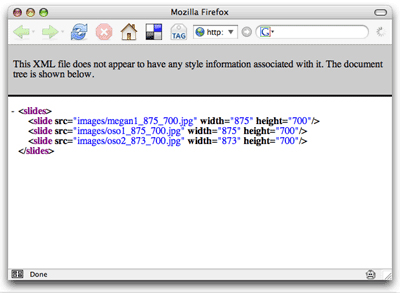
一共三幅圖片:我的女兒和我的兩條狗。當然在這里可以增加任何需要的細節或者多媒體,但我盡量保持例子的簡單性。
檢索 xml
下一步就是編寫一個 html 頁面(如 清單 2 所示)從服務器讀取數據并檢驗瀏覽器和服務器之間使用的 ajax 連接。這段 html 代碼包含內嵌的 javascript 代碼,檢索 xml 并打開一個警告窗口顯示服務器返回的文本。
清單 2. 簡單的 ajax 讀取數據頁面
<html>
<body>
<script>
function processreqchange()
{
if (req.readystate == 4 && req.status == 200 && req.responsexml != null)
{
alert( req.responsetext );
}
}
function loadxmldoc( url )
{
req = false;
if(window.xmlhttprequest) {
try {
req = new xmlhttprequest();
} catch(e) {
req = false;
}
}
else if(window.activexobject)
{
try {
req = new activexobject("msxml2.xmlhttp");
} catch(e) {
try {
req = new activexobject("microsoft.xmlhttp");
} catch(e) {
req = false;
}
}
}
if(req) {
req.onreadystatechange = processreqchange;
req.open("get", url, true);
req.send("");
}
}
loadxmldoc( "http://localhost/kenburns/slides.php" );
</script>
</body>
</html>
代碼從指定的 url 獲取 xml 內容,然后 loadxmldoc 函數啟動 ajax 請求。檢索頁面的請求異步發出并返回結果。請求完成后,對結果調用 processreqchange 函數。這里用 processreqchange 函數在警告窗口中顯示 responsetext 的函數值。在我的 firefox 瀏覽器中調用該頁面的結果如 圖 4 所示。
圖 4. 在警告窗口中顯示的 xml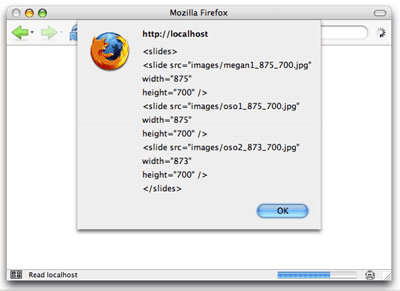
開局不錯。毫無疑問,我們從服務器取回了 xml 數據。但是有必要指出幾點。首先要注意 url 使用了絕對路徑,包括域名等等。對于 ajax 來說這是唯一有效的 url 格式。編寫 ajax javascript 代碼的服務器代碼總是創建有效的、完整格式的 url。
這里不那么明顯的另一點是 ajax 的安全保護措施。javascript 代碼不能請求任意的 url。url 的域名必須和該頁面相同。在這里域名就是 localhost。但必須指出不能呈現 www.mycompany.com 的 html 但卻讓腳本從 data.mycompany.com 檢索數據。域必須完全相同,包括子域名。
有趣的另一點是 loadxmldoc 中的代碼,似乎是費力地創建一個請求對象。為何這么麻煩呢?internet explorer 7 的預覽版沒有內建 xmlhttprequest 對象類型。因此必須使用 microsoft activex® 控件。
最后在 processreqchange 函數中,可以看到我在查看 readystate 是否等于 4,status 是否設為 200。readystate 的值 4 表示事務已經完成。status 的值 200 表示頁面是有效的。如果沒有找到頁面,就可能會得到錯誤消息 404,就像您在瀏覽器中看到的那樣。這里沒有處理異常情況,因為這僅僅是一個例子,不過發布的 ajax 代碼應該處理返回錯誤的請求。
動態創建 html
在說明如何創建幻燈片放映之前,首先擴展現在的例子,讓 processreqchange 函數用服務器返回的 xml 請求結果創建一個 html 表格。這樣做可以驗證兩件事:能夠讀取 xml 并能夠根據 xml 動態創建 html。
清單 3 顯示了修改后的代碼,它將從返回的 xml 創建表格。
清單 3. 改進的測試頁面
<html>
<body>
<table>
<tbody id="datatable">
</tbody>
</table>
<script>
function processreqchange()
{
if (req.readystate == 4 && req.status == 200 && req.responsexml != null)
{
var dto = document.getelementbyid( 'datatable' );
var items = [];
var nl = req.responsexml.getelementsbytagname( 'slide' );
for( var i = 0; i < nl.length; i++ )
{
var nli = nl.item( i );
var src = nli.getattribute( 'src' ).tostring();
var width = parseint( nli.getattribute( 'width' ).tostring() );
var height = parseint( nli.getattribute( 'height' ).tostring() );
var trnode = document.createelement( 'tr' );
var srcnode = document.createelement( 'td' );
srcnode.innerhtml = src;
trnode.appendchild( srcnode );
var widthnode = document.createelement( 'td' );
widthnode.innerhtml = width.tostring();
trnode.appendchild( widthnode );
var heightnode = document.createelement( 'td' );
heightnode.innerhtml = height.tostring();
trnode.appendchild( heightnode );
dto.appendchild( trnode );
}
load_slides( items );
start_slides();
}
}
function loadxmldoc( url )
{
req = false;
if(window.xmlhttprequest) {
try {
req = new xmlhttprequest();
} catch(e) {
req = false;
}
}
else if(window.activexobject)
{
try {
req = new activexobject("msxml2.xmlhttp");
} catch(e) {
try {
req = new activexobject("microsoft.xmlhttp");
} catch(e) {
req = false;
}
}
}
if(req) {
req.onreadystatechange = processreqchange;
req.open("get", url, true);
req.send("");
}
}
loadxmldoc( "http://localhost/kenburns/slides.php" );
</script>
</body>
</html>
在瀏覽器中打開該頁面將顯示 圖 5 所示的結果。
圖 5. 修改后的測試頁
修改后的 processreqchange 代碼現在查看 responsexml 對象而不是 responsetext 文本。此外,它還使用 getelementsbytagname 訪問所有的 <slide> 標記。然后解析 src、width 和 height 屬性,并使用 document 對象的 createelement 方法創建行和單元格來存放數據。該方法使用的 createelement 遠比過去的老方法健壯,原來要建立一個包含表格內容的 html 字符串,然后用 innerhtml 將數據添加到已有的元素中。
創建幻燈片放映
現在已經有了能夠確定幻燈片中圖像的 web 服務,還需要顯示這些幻燈片并執行 ken-burns-effect 動畫的客戶端代碼。為此必須將執行三種基本功能的 javascript 對象結合起來:
1、封裝圖像
2、提供基本的動畫引擎
3、實現特效(比如移動、縮放和漸變)
封裝圖像
首先從圖像容器開始,我創建一個類 imageinfo,如 清單 4 所示。
清單 4. imageinfo.js
function imageinfo( src, width, height, htmlobj )
{
this.src = src;
this.width = width;
this.height = height;
this.current_width = width;
this.current_height = height;
this.htmlobj = htmlobj;
this.htmlobj.src = this.src;
this.htmlobj.width = this.current_width;
this.htmlobj.height = this.current_height;
}
imageinfo.prototype.set_opacity = function( opacity )
{
this.htmlobj.style.mozopacity = opacity / 100;
var f = 'progid:dximagetransform.microsoft.alpha(opacity='+opacity+')';
this.htmlobj.style.filter = f;
}
imageinfo.prototype.set_position = function( x, y )
{
this.htmlobj.style.left = x+'px';
this.htmlobj.style.top = y+'px';
}
imageinfo.prototype.set_size = function( w, h )
{
this.current_width = w;
this.current_height = h;
this.htmlobj.width = this.current_width;
this.htmlobj.height = this.current_height;
}
imageinfo.prototype.get_image = function()
{
return this.htmlobj;
}
imageinfo.prototype.hide = function()
{
this.htmlobj.style.visibility = 'hidden';
}
imageinfo.prototype.show = function()
{
this.htmlobj.style.visibility = 'visible';
}
幻燈片中每幅圖片都有一個對應的 imageinfo 對象。該對象封裝了圖像信息:src、width 和 height。該對象還包含對在文檔中顯示圖像的 html <img> 標記的引用,以及移動圖像、設置透明度等的 helper 方法。注意,在 firefox 和其他基于 gecko® 的瀏覽器中,mozopacity 樣式用于設置不透明性。internet explorer 中則使用過濾器效果。
創建簡單的動畫引擎
下面我們來編寫一個簡單的動畫引擎。animation.js 文件中的代碼如 清單 5 所示。
清單 5. animation.js
function animation( am, img, seconds, effects )
{
this.img = img;
this.animationmanager = am;
this.seconds = seconds;
this.effects = effects;
this.startms = 0;
}
animation.prototype.start = function()
{
this.animationmanager.add( this );
this.startms = 0;
this.img.hide();
for( var e in this.effects )
{
this.effects[e].apply( 0 );
}
this.img.show();
}
animation.prototype.animate = function()
{
var d = new date();
if ( this.startms == 0 )
this.startms = d.valueof();
var p = (((d.valueof()-this.startms)/1000)/this.seconds)*100;
for( var e in this.effects )
this.effects[e].apply( p );
}
animation.prototype.done = function()
{
var d = new date();
return ( ( d.valueof() - this.startms ) / 1000 ) > this.seconds;
}
function animationmanager( speed )
{
this.animations = [];
var self = this;
window.setinterval( function() { self.idle(); }, speed );
}
animationmanager.prototype.add = function( anim )
{
this.animations.push( anim );
}
animationmanager.prototype.idle = function()
{
if ( this.animations.length > 0 )
{
this.animations[0].animate();
if ( this.animations[0].done() )
this.animations.shift();
if ( this.animations.length == 0 )
this.on_finished();
}
}
animationmanager.prototype.on_finished = function()
{
}
清單 5 包含兩個類:animation 和 animationmanager。animationmanager 類控制定時器并向其 animation 對象列表中的第一項發送動畫消息。當 animation 對象報告自己已經完成的時候,該類就轉向下一項,依此類推。
animation 在一定的時間(按秒數指定)內對特定圖片應用一系列特效。animation 對象需要計算完成度消息并將其發送給每種特效的 apply 方法。特效然后根據這個百分比計算應該如何處理圖像。比如,移動特效知道起點和終點,可以根據這個百分比計算應該將圖像放到何處。如果是 50%,圖像應該移到起點和終點之間。
作為我工作的一部分,同時也為了撰寫本文,我考察了大量的 javascript 動畫代碼。javascript 動畫經常因為不穩定而受到指責,因為所有 javascript 動畫都使用 window.setinterval 方法來完成。這是一個定時器方法,同時指定了回調時間間隔和回調函數。web 上的大部分代碼都要求每次調用該函數時動畫移動一步。但這并不能真正工作,因為告訴瀏覽器的間隔僅僅是一個建議。如果規定 20 毫秒,但實際上可能第一次在 25 毫秒時調用,下一次卻要等到一秒鐘以后。瀏覽器是單線程的,因此不能依賴于定時器。
解決方案是使用 date 對象的 valueof 方法確定動畫開始了多長時間。這個時間差是用毫秒計的,用于確定當 setinterval 定時器離開時動畫應該執行百分之多少。該方法可以提供規定的任意長時間的平滑動畫。
執行特效
三個核心類的最后一個是 ken burns effects。這些特效通過 animation 對象應用于圖像,如 清單 6 所示。
清單 6. kenburnsanimations.js
function kenburnsfader( img, windowsize )
{
this.img = img;
this.windowsize = windowsize;
}
kenburnsfader.prototype.apply = function( percent )
{
var opacity = 100;
if ( percent <= this.windowsize )
opacity = ( percent / this.windowsize ) * 100;
else if ( percent >= ( 100 - this.windowsize ) )
opacity = ( ( 100 - percent ) / this.windowsize ) * 100;
this.img.set_opacity( opacity );
}
function kenburnszoomer( img, start, end, cw, ch )
{
this.start = start;
this.end = end;
this.img = img;
var wr = this.img.width / cw;
var nw = this.img.width * wr;
var nh = this.img.height * wr;
this.sw = ( nw * ( this.start / 100 ) );
this.ew = ( nw * ( this.end / 100 ) );
this.sh = ( nh * ( this.start / 100 ) );
this.eh = ( nh * ( this.end / 100 ) );
this.dw = ( this.ew - this.sw ) / 100;
this.dh = ( this.eh - this.sh ) / 100;
}
kenburnszoomer.prototype.apply = function( percent )
{
this.img.set_size(
this.sw + ( this.dw * percent ),
this.sh + ( this.dh * percent ) );
}
function kenburnsmover( img, sx, sy, ex, ey, cw, ch )
{
this.img = img;
this.sx = sx / 100;
this.ex = ex / 100;
this.sy = sy / 100;
this.ey = ey / 100;
this.cw = cw;
this.ch = ch;
this.wr = this.img.width / this.cw;
}
kenburnsmover.prototype.apply = function( percent )
{
var nw = this.img.current_width * this.wr;
var nh = this.img.current_height * this.wr;
var cntw = ( ( this.cw / 2 ) - ( nw / 2 ) );
var cnth = ( ( this.ch / 2 ) - ( nh / 2 ) );
var sx = ( nw * this.sx );
var ex = ( nw * this.ex );
var sy = ( nh * this.sy );
var ey = ( nh * this.ey );
var dx = ( ex - sx ) / 100;
var dy = ( ey - sy ) / 100;
var x = cntw + sx + ( dx * percent );
var y = cntw + sy + ( dy * percent );
this.img.set_position( x, y );
}
這三個類分別處理應用于圖像的不同特效。kenburnsfader 類使用不透明度處理圖像的淡入淡出。kenburnszoomer 類處理圖像的縮放,從最初的大小到最終的大小。kenburnsmover 類處理圖像的移動,從起點到終點(用圖像的百分比指定)。
經過一些試驗后,我發現最吸引人的移動特效是相對于窗口中心從一個角移動到另一個角。kenburnsmover 類的 apply 方法包含一些復雜的數學運算,不僅相對于包含圖像的 <div> 標記的中心來移動,還要計算圖像和 <div> 標記的相對大小,這樣在小窗口中移動的距離就小,在大窗口中移動的距離就大。放大倍數根據窗口的高度確定。
實現非 ajax dhtml
有了這些基礎類之后,就可以實現幻燈片的非 ajax dhtml 版本來進行測試了,如 清單 7 所示。
清單 7. 非 ajax 幻燈片放映
<html>
<head>
<style type="text/css">
body { background: black; margin: 0px; padding: 0px; }
</style>
<script src="kenburnsanimations.js">
</script>
<script src="animation.js">
</script>
<script src="imageinfo.js">
</script>
<script>
var g_animationmanager = new animationmanager( 50 );
var g_current_slide = 0;
var g_slides = [];
var g_directions = [
{ sx: [ -30, 0 ], ex: [ 5, 40 ], sy: [ -30, 0 ], ey: [ 5, 40 ] }, // nw -> se
{ sx: [ 5, 40 ], ex: [ -30, 0 ], sy: [ 5, 40 ], ey: [ -30, 0 ] }, // ne -> sw
{ sx: [ 5, 40 ], ex: [ -30, 0 ], sy: [ 5, 40 ], ey: [ -30, 0 ] }, // se -> nw
{ sx: [ -30, 0 ], ex: [ 5, 40 ], sy: [ 5, 40 ], ey: [ -30, 0 ] } // sw -> ne
];
g_animationmanager.on_finished = function()
{
g_current_slide++;
if ( g_current_slide >= g_slides.length )
g_current_slide = 0;
g_slides[ g_current_slide ].start();
}
function rnd( start, end )
{
return ( math.random() * ( end - start ) ) + start;
}
function load_slides( images )
{
var ic = document.getelementbyid( 'imgcontainer' );
for( var i in images )
{
var img = images[i];
var imgobj = document.createelement( 'img' );
imgobj.style.position = 'absolute';
imgobj.style.left = '0px';
imgobj.style.top = '0px';
imgobj.style.visibility = 'hidden';
ic.appendchild( imgobj );
var ii = new imageinfo( img.src, img.width, img.height, imgobj );
var szoom = rnd( 50, 100 );
var ezoom = rnd( 70, 120 );
var d = parseint( ( math.random() * g_directions.length ).tostring() );
var di = g_directions[ d ];
var sx = rnd( di.sx[0], di.sx[1] );
var sy = rnd( di.sy[0], di.sy[1] );
var ex = rnd( di.ex[0], di.ex[1] );
var ey = rnd( di.ey[0], di.ey[1] );
g_slides.push(
new animation( g_animationmanager, ii, 10,
[ new kenburnszoomer( ii, szoom, ezoom, ic.clientwidth, ic.clientheight ),
new kenburnsmover( ii, sx, sy, ex, ey, ic.clientwidth, ic.clientheight ),
new kenburnsfader( ii, 30 ) ] )
);
}
}
function start_slides()
{
g_slides[ g_current_slide ].start();
}
</script>
</head>
<body>
<div
id="imgcontainer">
</div>
<script>
var images = [
{ src: 'images/megan1_875_700.jpg', width: 875, height: 700 },
{ src: 'images/oso1_875_700.jpg', width: 875, height: 700 },
{ src: 'images/oso2_873_700.jpg', width: 873, height: 700 }
];
load_slides( images );
start_slides();
</script>
</body>
</html>
不用電影是很難說明上述代碼在瀏覽器中的運行結果的。因此我抓了一個快照,如 圖 6 所示。
圖 6. 幻燈片放映的快照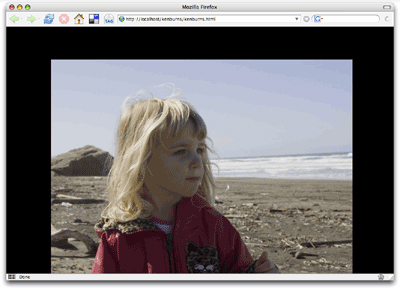
該頁面首先通過 <script> 標記的 src 屬性引入基類。安裝這些類之后,增加兩個函數將整個機制組織到一起:load_slides 和 start_slides。load_slides 函數接收一個數組,包括圖像的 src、width 和 height,然后創建 <image> 標記和動畫。start_slides 函數從第一項開始啟動幻燈片放映。
附加在動畫管理器上的另一個方法 on_finished 在動畫完成時調用。我使用該通知移動到下一張幻燈片,如果已經完成所有幻燈片的動畫,則回到列表中的第一張。
再回到 load_slides,要注意它引用了一個名為 g_directions 的數組。該數組包含一些隨機范圍,幻燈片加載程序用它來規定圖片移動的起點和終點。最理想的效果是從一個角到另一個角。從注釋中可以看到,這些值規定幻燈片的移動范圍為東北、東南、西北和西南的任意組合。最后的 <script> 標記定義了一個圖像數組,然后使用 load_slides 和 start_slides 函數啟動幻燈片放映。
新聞熱點


疑難解答